- Basic
- Options
- Tab \"in the IMG\"
- Tab \"in the folder\"
- tab \"Settings\"
- Tab \"Strings\"
- Adding screenshots
- Add video
- Publication mod online
All you know is that the modes from our website are automatically installed. To add events to the site is no longer enough to simply upload the archive to the instruction. Nevertheless, we have tried to simplify the addition of as much as possible. Now I will tell what is to be done.
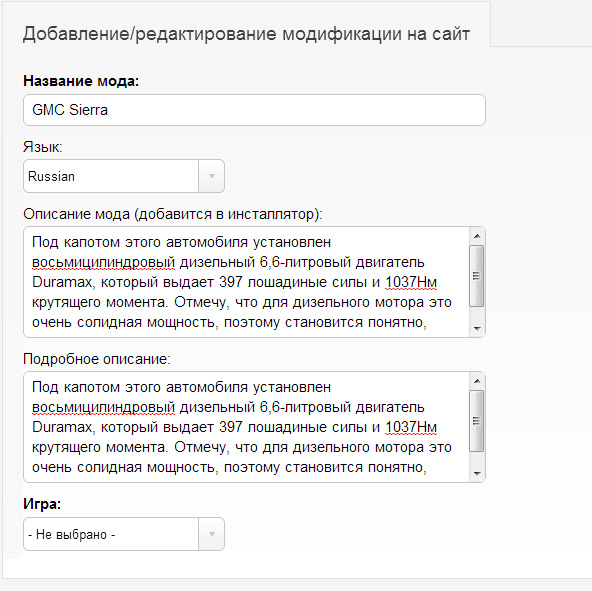
As an example, I will add a mod cars in GTA San Andreas - GMC Sierra. Take a good look as I filled out the field.
If you are logged in, then the right of the top panel you will have such an item as a \" Add \". Hover over it and click \" Add mod \".
1. The main parameters
You must first fill out basic information, such as \" Name \", \" Summary \" and \" Detailed Description \". Brief description is added to the installer, and a detailed display on the site. Binding is only the field \" Name \", but try to fill in all the fields.
2. More Search Options
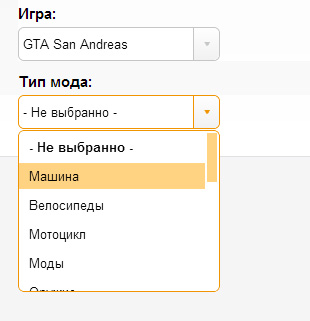
Then choose the type of game and added modifications. I choose to play GTA San Andreas and the type of modification \" machine \":
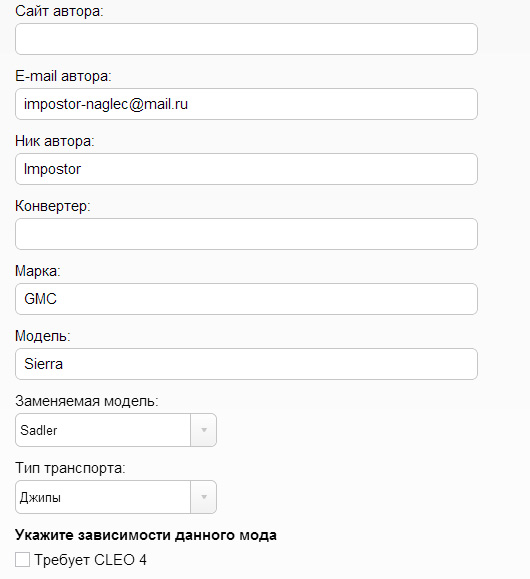
You must then fill in additional information. More fields may be different for different types of games and modifications. So how do I add a car for GTA San Anreas, then I need to fill in fields such as \" Nick\'s \", \" Author website \", \" e-mail the author \",\" Mark \"and\" Model \". Do not forget to mention the authors , because it is thanks to their efforts, we have these modes. When you add machines must indicate its Mark and Model , to mod was in a category of our directory of files.
Also at this stage, you should note depending on mod. It so happens that for the same mod that was necessary to set yet another mode, such as for CLEO scripts, you must first install the library CLEO. Check one of dependence and move on to the next step.
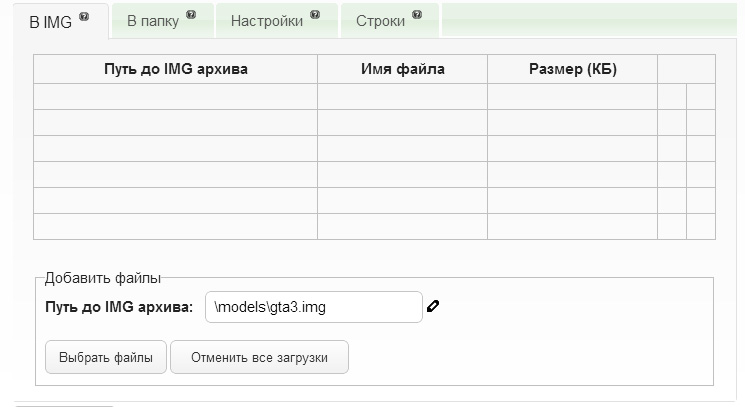
In my case, below are 4 tabs: In the IMG, in the folder settings and strings. Each tab has a tooltip, for information for which it serves. To help came just hover your mouse over the question mark in the tab you are interested .. When you add other game modes in the number of tabs may be different.
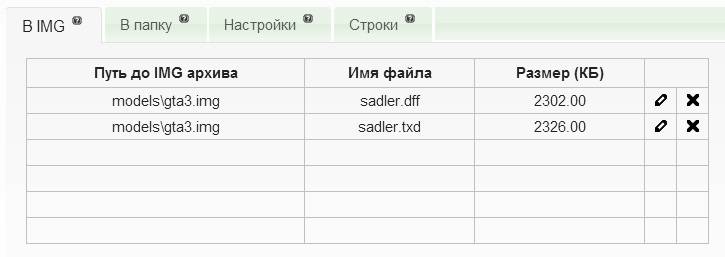
3. Tab \"in the IMG\"
On this tab, you must provide the installer files that need to be placed in any *. img file. If this is not desired, this tab can not fill anything. To upload files, click on the button \" Upload Files \" and select the files you want. You can just a few. After you select the files on your computer, click \" Open \".
(As I add car mod, I need to load this tab files added models: sadler.dff and sadler.txd)
file you selected will immediately be pumped to the server. If you change your mind, you can stop the download by clicking on \" Cancel all downloads \" or you can remove from the queue a separate file by clicking on the X next to it. For each file, specify the path to the *. Img file. The path is relative to the folder with the game. When you upload any file is associated with *. Img file by default (modelsgta3.img for GTA SA, VC or pcmodelscdimagesvehicles.img for GTA IV). The default path can be changed by clicking on the pencil icon next to it.
After downloading all the files are displayed in the table. The parameters of any file can be changed by clicking on the pencil icon on the appropriate line.
4. Tab \"in the folder\"
If the installation mode to add or replace some of the files in the folder with the game, it can be done on the second tab - to folder . All as well as adding a *. Img only way to specify not to file and folder in which to copy. If you want to copy directly to the game folder, leave the path blank. If you want to place the file in a subfolder, specify the path to it (eg data , or CLEO , or commondata ).
(I add the usual car mod without the support of the CLEO library or some other function, so this tab I\'m missing, because I have nothing to add to it)
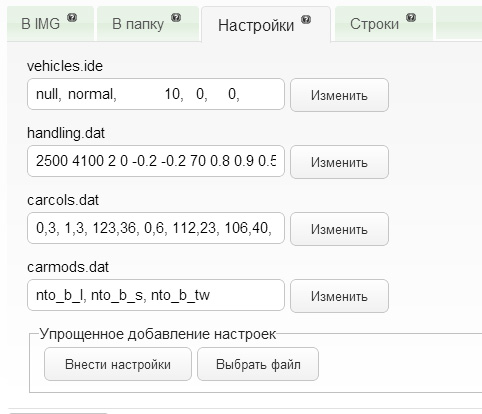
5. The tab \"Settings\"
On the third tab you need to make various settings for the transport of:
- Wheel size and frequency of auto - vehicles.ide;
- Performance, configuration management, and behavior of car - handling.cfg;
- Color of transport - carcols.dat;
- The presence of tuning - carmods.dat (only for GTA SA).
When New models on this tab will automatically populate the default settings of the game. (The default settings are suitable to the modes only in a few cases, so do not forget to enter the settings for the author to add mod. Next, I will tell you how to do it.)
Add settings.
For your convenience, we have come up with a simplified add-on. If you have a conventional mod, such as a new car model, then make a quick adjustment can be downloaded to the included ReadMe file mod. To do this, click \"Upload ReadMe\" to block \"Simplified setup adding\" and select the most ReadMe file. Once it is loaded the system will try to recognize the settings and make it into a table.
Also for your convenience, we have come up with another variant of easily adding settings. Click on the \"Add Settings\" and you will see a field for entering the settings (I add the GMC Sierra, which replaces Sadler in the game. To make the new settings I control this tab and fill):
Just copy the lines here that need to be replaced in these standard files, click the \" OK \" and they will be automatically added to the table.
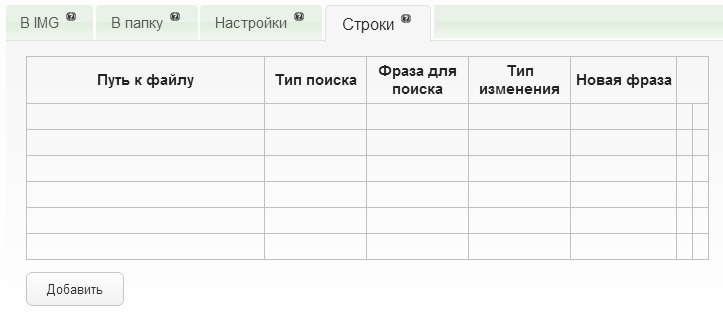
6. Tab \"Strings\"
Adding
settings described in the previous tab is only good when you add the usual modes of transport, ie new car, motorcycle, helicopter, etc. Of course, most of these mods, but sometimes it is necessary to replace or add a line in the files for more complex mods. For this is the last and fourth tab - String . This manual addition. Click on the \" Add \" and you will see a form to add, where necessary to fill line (the path to the file type your search phrase, a new line), but more on that next time.
(I add the usual car mod without any change in the other game files, so this tab I\'m missing, because I have nothing to add to it)
After all the necessary settings can be made safely to press « Save ». If everything is correct, then the screen will display the successful addition of mod:
7. Adding screenshots
Then move on to the list of your modifications. This is the point My mods in the custom menu.
On this page you can view a list of your modifications, download, edit, add screenshots and videos, as well as delete any of your style. Edit or delete modification can be as long as you do not send it for publication (greenish arrow).
So, after a generation of mod we have to download it and check it before publishing operation, and to make it in the game screenshots ( mod without screenshots we do not publish online! ).
( Last time, we often ask questions about how to take a screenshot of the game , so ; lay out detailed instructions : How to make a screenshot of the screen from the game ).
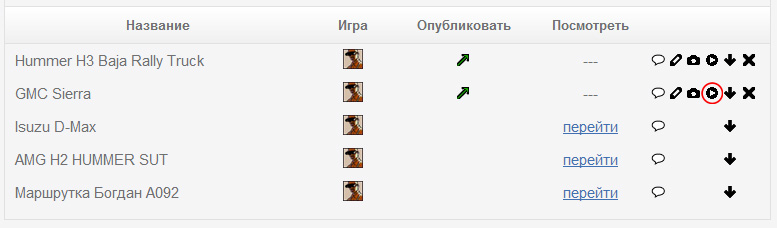
- We click on the icon \" Download \" - marked with a red circle in the screenshot above - will open a new window for the standard races files from our server.
- Download, you just generated events.
- Install it into the game.
- Find the set of modes in the game and check that it is working. In my case, this mod - the machine to quickly find it in the game I use the Trainer: San Andreas Crazy Trainer [/url] .
- Do screenshots (at least 3 pieces from different angles, preferably 5 or more). As I pointed out above a very is convenient to do in-game screenshots using Fraps .
- Exit the game and go to the section on the website My mods , to add just made screen shots and send the file to the publication.
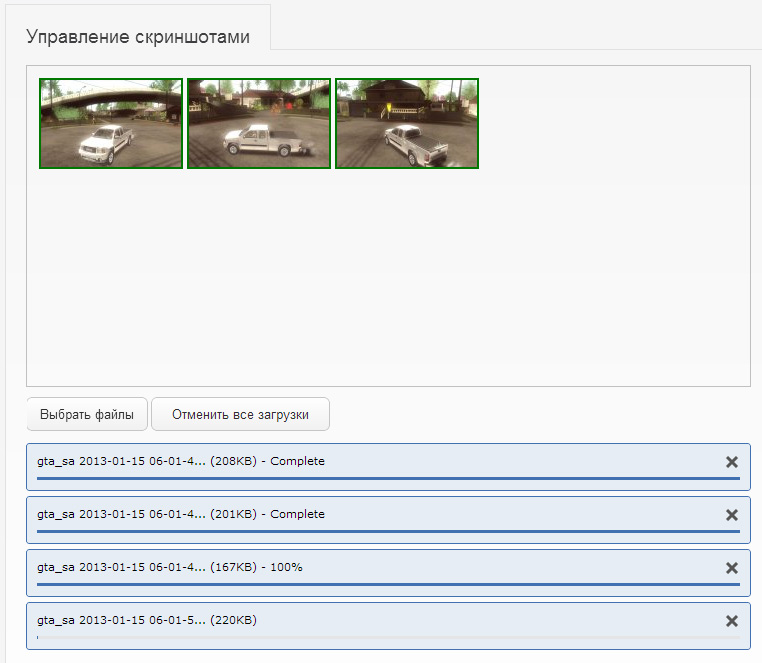
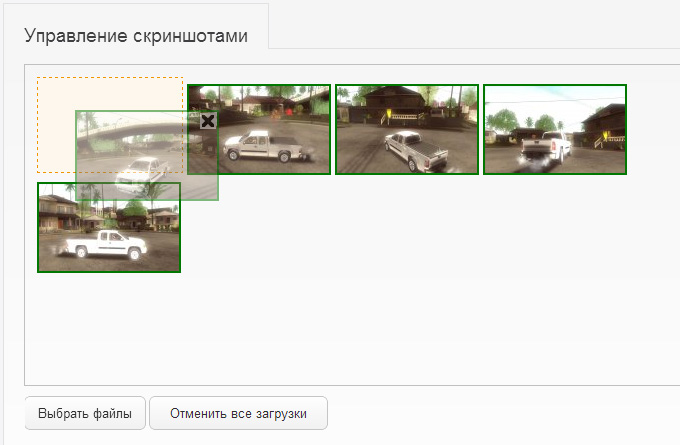
Adding screenshots to the generated modules.
To go to the section Office of screenshots - click on the camera icon - marked with a red circle in the image below:
page opens \" Office of screenshots \". In order to upload screenshots, click on the button \" Upload Files \" and select the screenshots. You can just a few. After the selection, click the \"Open\" and they will be loaded on the server:
If during loading screens once you have downloaded or you just do not like the screenshot downloaded, it can always be removed by hovering the mouse cursor over it and clicking on the \"X\" - a screenshot will be removed immediately. You can also sort the screenshots in the right order for you - just drag the screenshot. Screenshot, which will come first get to the main page.
After all screenshots will be added press the \" Save \", at the bottom of the page and the system you are immediately redirected to the page My mods .
8. Adding video
To go to the section Office of videos - click on the video icon - marked with a red circle in the image below:
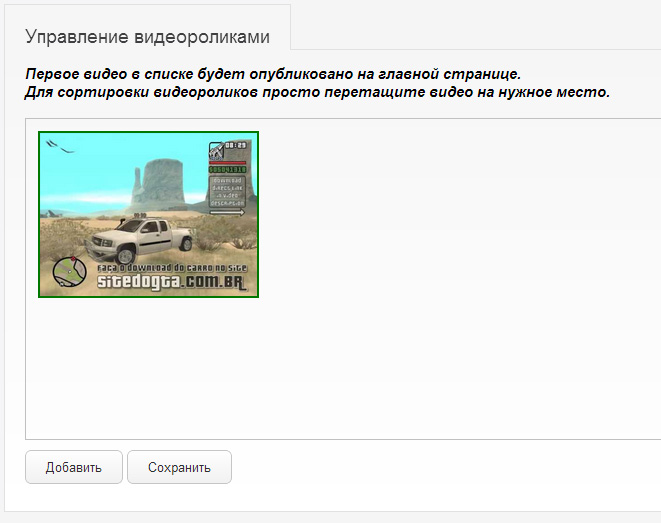
page opens \" Office of videos \". To add a video, click on the \" Add video \" in the URL field, enter a link to a video YoutTube.com, click the \" Add \" and the video will be added.
If in the process of adding video you downloaded too much, then it can always be removed by hovering the mouse cursor over it and clicking on the \"X\" - the video will be removed immediately. Also, you can sort the videos in the right order for you - just drag and drop the desired location. Video that will come first hits the front page.
Once all the videos will be added press the \" Save \", at the bottom of the page and the system you are immediately redirected to the page My mods . Now we only have to publish an added mod!
9. Publication mod online
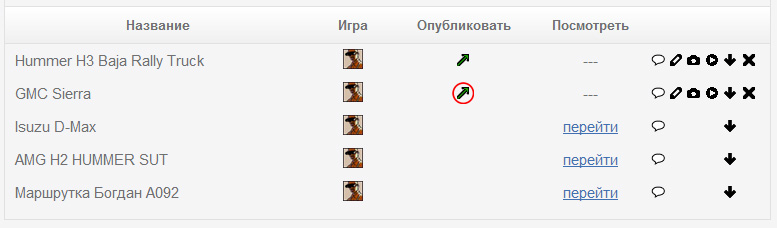
to publish mod click on \" green arrow \":
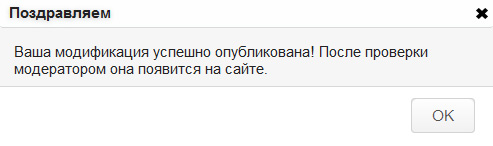
Here is the message:
Hooray! Maud was published and after checking by the moderator, he will appear on the site.
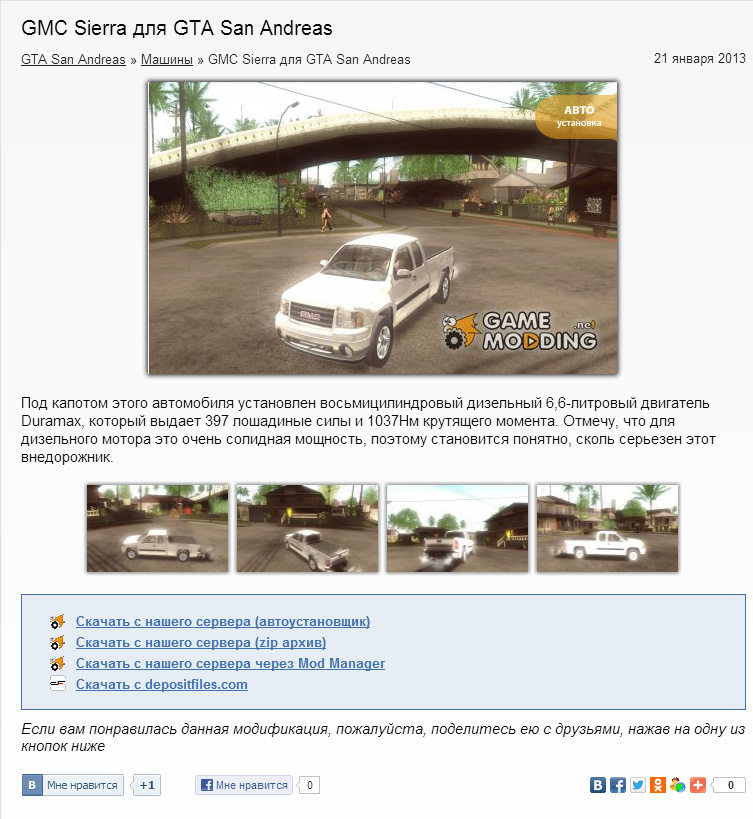
Here\'s how it looks on the website:
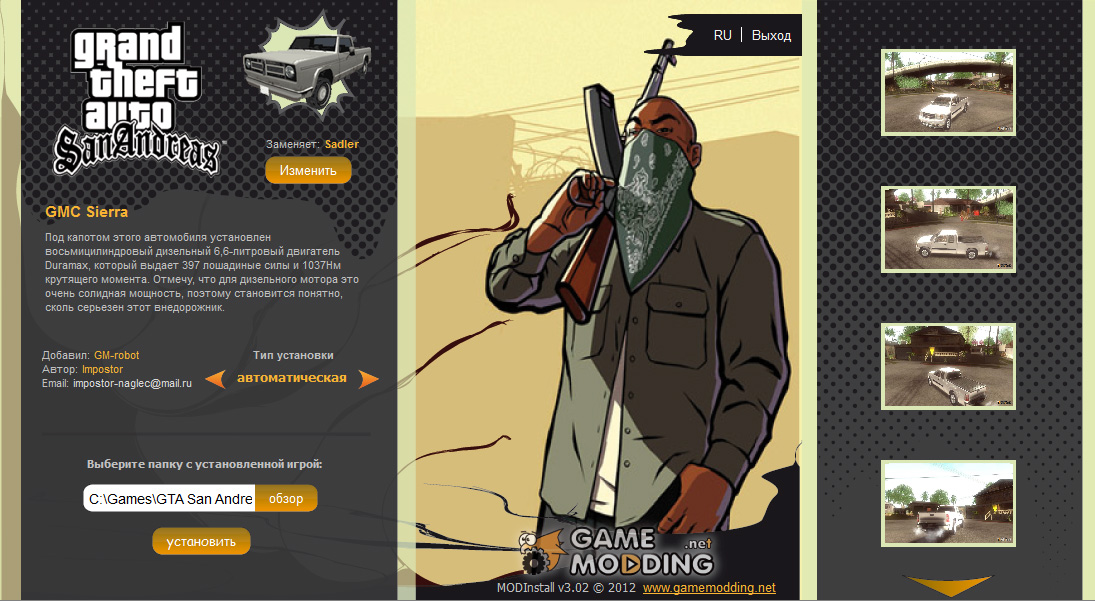
But he looks so mod with automatic installation:
Successful Content!!!